Hey, remember me? -waving- Yeah, probably not, since it has been almost a year since I last posted. Anyone still out there? -crickets- Anyway, looking back I see that it was almost exactly a year ago that I posted my sock monkey costume post. This year's costume for my friend's son Cheeks turned out so well that I wanted to share.

Ms. J is awesome at coming up with ideas. I think we make a great team. She has the ideas, and I have a sewing machine. We are a good pair. This year she suggested an iPod and since I received one for my birthday several months ago, I was all over it.
Since Cheeks is only 3, and all about comfort, we knew that the typical box costumes that people make for iPods was not going to work. So I had to come up with a soft costume that was easy to get out of for potty breaks and naps. And it had to be fun or Cheeks would just not wear it.

Here is a walk through of the steps I took to make the iPod costume. Please remember, iPod and the Apple logo are copyrighted and if you decide to use this tutorial, do not sell the costume. I gifted this to my dear friends and made no money off of it.
Measuring
I measured the span of Cheeks' shoulders and from the base of his neck to the backs of his knees. I added 4" to the shoulder measurement and used both measurements to come up with the width and height of the front and back panels. I used black felt by the yard for structure on both the front and back, with a silver satin overlay for the back. I used a zig zag stitch to attach the satin to the back felt piece. Satin is very slippery, so make sure you pin A LOT.

I used strips of 1" wide felt to edge the back, but in retrospect, I would use broadcloth if I did it again.
Painting the Back
For the back logos, I had Ms. J print out the silhouettes, which I cut out and used as patterns. I used a black micro pen used for scrapbooking to trace the pattern. I then used a stiff brush and metallic silver fabric paint to fill in. It needed two layers of paint, and I made sure that each layer dried overnight.
 The Apps
We started with Cheeks' favorite iPod apps, and added a Facebook one for mom. I had Ms. J print off 4" square "patterns" that I would use to make the felt apps. You can adjust based on the size you are making. After cutting out each colored part of the pattern, I used either a fine line black pen (I like the micro ones for scrapbooking) or a white fabric paint pen to trace the patterns onto the felt. I need to test the white or silver scrapbooking pens, as the paint pen is really too wide. Plus you have to add on dry time.

Next I cut out each piece and stacked it for gluing later. I rounded the corner of each base square but tracing the edge of a medicine cap. Keep in mind that apps with more colors need some creative cutting, so you don't have too many layers. For instance, I cut out the HD letters from the red portion of the Angry Bird, so that it would fit like a puzzle piece. I did the same with the Fruit Ninja watermelon. For that I cut out the entire top and top and bottom in two different greens, stacked them, then cut out the "stripes." Stacking insures that the cuts are exact and they will fit snugly.
 Adding details
For some of the apps, I added paint details before gluing. This was especially needed for Angry Birds, which has a thicker outline. I used a black fabric pen and carefully marked along the edge. For the line on the beak I used my black scrapbook pen again. The eyes didn't have all the detail I wanted, but I started with a dot of brown, followed by a smaller dot of black and and even smaller dot of white. You MUST wait for each dot to dry, or they will run together. Pac Man's detail comes from Scribbles paint. I love the fine line and and brightness that those paints offer.I glued him down first before adding the detail. Netflix also needed to be glued down before adding details.

Tacky glue is my favorite to use for felt. I like to cover the entire back of the piece to be glued. I just glob it on and use my finger to spread it. If you don't spread the glue, it will show through on lighter felt and I find that it does not hold as well. Make sure you use enough though, because the felt will absorb some. Depending on which side of the felt you glue, you may or may not need to trim strings before gluing down a piece. If you haven't noticed before, felt really has two different sides. One is more fuzzy than the other. The non fuzzy side takes the paint detail better, but the fuzzy side can be hard to work the glue in. I glue the fuzzy side only if I needed strong details on the other side.
Putting it together
Originally I was going to sew the shoulders together and then down the sides, leaving space for arm holes. At our fitting, when I had the seams safety pinned, I realized that Cheeks was not going to stand for this. It wold fit a little slim. Also, Cheeks' brother, Little Budda, might not be able to use it as a hand-me down. With homemade costumes I think it is very important to consider the sibling factor. So instead I used straps. I cut 1" x 4" straps and added Velcro to the ends that would attach to the front. I then attached the other end of the strap to the black binding on the back. The two shoulder straps were cut down to just the length of the velcro, so they fit more snug.
 Happy Halloween!
Cheeks was a hit at the party his family went to. The other kids kept trying to tap the apps to make them work. And as you can see from the pictures above, he had no trouble moving around. My biggest regret is that we didn't have time to make a matching Nano costume for Little Budda.
I can't wait to see what ideas Ms. J comes up with next year. She also took all these pictures. Check out her own blog at:
http://jamielynnephoto.blogspot.com/


 Ms. J is awesome at coming up with ideas. I think we make a great team. She has the ideas, and I have a sewing machine. We are a good pair. This year she suggested an iPod and since I received one for my birthday several months ago, I was all over it.
 Here is a walk through of the steps I took to make the iPod costume. Please remember, iPod and the Apple logo are copyrighted and if you decide to use this tutorial, do not sell the costume. I gifted this to my dear friends and made no money off of it.
 I used strips of 1" wide felt to edge the back, but in retrospect, I would use broadcloth if I did it again.
 The Apps
 Next I cut out each piece and stacked it for gluing later. I rounded the corner of each base square but tracing the edge of a medicine cap. Keep in mind that apps with more colors need some creative cutting, so you don't have too many layers. For instance, I cut out the HD letters from the red portion of the Angry Bird, so that it would fit like a puzzle piece. I did the same with the Fruit Ninja watermelon. For that I cut out the entire top and top and bottom in two different greens, stacked them, then cut out the "stripes." Stacking insures that the cuts are exact and they will fit snugly.
 Adding details


 Being on a tight budget, like many families, I try to reuse as many pieces of clothing as possible for multiple kids. Very often kids will outgrow an article of clothing long before they trash it. Not so in the case of Dimples and his jeans. He is a knee buster and has torn through the right knee of nearly every pair of pants he as worn since he was about 2. This has left me with many pairs of pants, where the only thing wrong is a hole in the knee. For four years I have held on to these, not exactly sure what to do with them, but not wanting to throw them away. I also didn’t want to give them away, because who wants a holey pair of jeans?
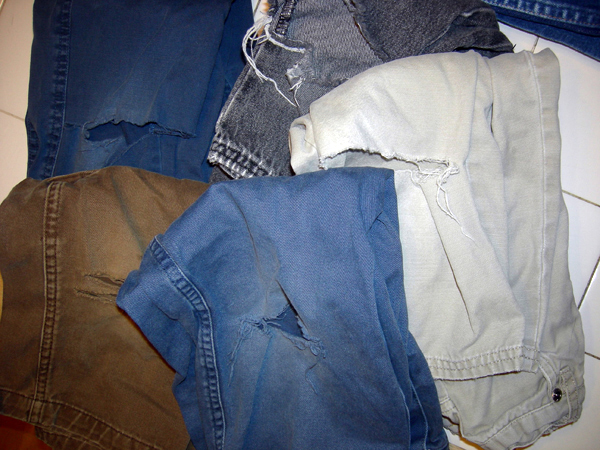 So when Cricket needed new jeans, I started searching online (because who wants to browse at a store with three kids in tow?) and found that, yes, people do want holey jeans and apparently will pay ridiculous amounts for jeans with a worn look. I finally figured out how to salvage all those holey jeans and outfit Cricket for the winter with little to no money spent on doing so. I am going to try to make this a tutorial of sorts, because I know others out there might want to try the same thing.
 The first step is to clean up the hanging threads on the jeans that need to be patched. I just clipped off the longest threads. Next I cut a patch out of the black jeans that would fully cover the hole. I didn't want this to look too "done" so I didn't measure or even make sue that the rectangle was even. I also didn't leave extra material for turning under edges for two reasons. One, trying to sew through 3 layers of denim (one for the jean, two for the turned seam patch) would likely break my needle. And two, I wanted the edges to fray with washing, giving it a look like all those expensive, designer jeans.
  Now you could hand sew the patch on, but with small jeans like this, even that will be tricky. I prefer machine sewing, so I had to open up a seam. From what I can tell, there are two different types of seams on a pair of jeans. There is your "typical" seam, where no stitching shows, and the "jean" seam where you see the top stitching, often done in yellow. Which side the typical seam is on varies. For instance, the pair of jeans I am wearing while typing this has the typical seam on the outside, but the pair used for this post has it on the inseam. It is the typical seam that you want to open up, otherwise you will need to match up the thread used for the top stitching.
  Turn the jeans inside out so you can easily get to the seam. Get out your seam ripper and open a hole that is large enough for you to move around, but avoid opening it all the way to the bottom hem. It will be harder to close if you have to deal with the bottom hem as well. Start small at first, you can always open it further if needed. If you don't have a seam ripper, you need to get one. I consider it to be one of the most important items in a sewing kit, regardless if you are a master sewer or just patch things here and there.


 You may have noticed that the title of this post says Part 1. That is because I am also in the process of re-working jeans for the other two kids. For Dimples, I am re-working two pairs of his sister's old jeans. I am not sure yet exactly what I will do, but I will post once figure it out. For Freckles, she has a large number of jeans that are just one size too small for her. My plan there is to take out the outside seam and add fabric to increase the size. A post on that will also be put up once it is finished.


